Showing posts with label Marisol. Show all posts

Wednesday, October 30, 2013

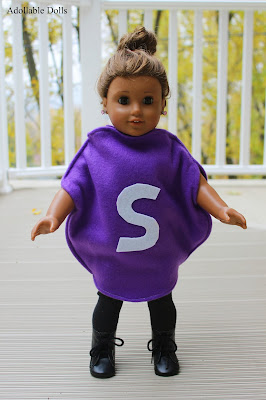
DIY Skittle Costume

Hey everyone!  Halloween is tomorrow.  How many of you celebrate it?  We don't, however we did get invited to a costume party.  The theme was food.  We weren't quite sure what to do until the idea struck us: a Skittle!  This is a super easy, last minute costume idea.  And who doesn't like Skittles?
You're going to need:
-fabric (we used fleece, but whatever you have on hand will work)
-felt with a sticky back (you can find this at Walmart, Michaels, and other craft and fabrics stores)
-dinner plate
-scissors
-sewing machine or needle and thread
-pins
-pencil

Fold the fleece in half.  Lay a dinner plate on the fleece and trace it.  Cut out the circle.

 You should now have to circles.

 Right sides together, pin the edges.  Leave a 6 inch hole at the top (for the head) and at the bottom (for the legs) and a 3 inch hole on the sides (for the arms).

 What the sewing should look like.

Right side out the fabric and topstitch right near the edge.  DO NOT sew the holes together.  Topstitch around the holes to hold back the extra back.  We didn't topstitch around the armholes because it was to small for our sewing machine, but it you want, you can hand sew that part.

 On the back of the sticky felt draw a BACKWARDS "S."  It's important that you draw it backwards so that when you stick it on it's the right way.

 Cut out the "S", peel the backing off, and stick on to the fabric.
You're done!  We wore a white tank, denim leggings, and lace up boots with the costume.


We would love to see pictures if you made this or used it as inspiration for a similar costume?  (Maybe M&M's?)  Please either email a picture to sodapopstreet@gmail.com or post it on Instagram and tag us @sodapopstreet and include the hashtag #adollabledollscostume

Have fun!
Marisol

Saturday, August 24, 2013

Meet All of Us Dolls

Hey everyone!  Long time no post?  :)  We have been busy with fall activities picking up, getting ready for school, and enjoying the last few days of summer (we start school on Monday, yikes!).  Last weekend we made an all of us dolls video.  If you haven't seen it already on YouTube (our channel is MyInnerStarUStudios) then watch it below.  Plus, most of you don't know this, but I (Katie) got some more dolls.  Yup, that's right dollSSSSS!  Watch the video to see which ones! :)


Tuesday, June 11, 2013

Make a No-Sew Sleeping Bag!


Today I went to the craft cabin.  When I walked in our camp leader, Grace, waved me over to her table. 
"What are we making today?" I asked.
"No-sew, fleece sleeping bags."

First, I picked out some scissors.


Then Grace handed me some fleece.  That's a lot of fleece!

Then I cut out the rectangle.  First, fold your fabric in half.  Your feet will be where the fold is.  Then cut a rectangle 14 inches wide and 20 inches tall/long.  Fold the top layer of fleece about 5 inches back like the picture below.

Cut slits 1/2 inch wide and 1 1/2 to 2 inches deep.  Tie the ends into knots.  Once you get to a fold (either on the top or bottom) cut it like the picture below.  For the part you folded back you will have 3 layers of fleece to tie.

Cut off the extra fleece on the sides.
Your done!  Wasn't that super easy?  You can add a pillow by cutting another square of fleece and placing it on top of the top part/the part with no knots.  (If that makes any sense.)  Sew 3 sides, stuff with fleece, and then sew the 4th side.
After I finished I hurried back to our cabin to try it out and get some pictures.  As you can see Nadia photo bombed the first one. :)

It was so warm and cozy that I had to take a little nap!

What have you been doing at Camp Doll Diaries?

Marisol

Wednesday, May 22, 2013

Adollable Photography: Bokeh


Bokeh may sound like a fancy and complicated word, but it really isn't.  Bokeh is of out-of-focus areas in a photograph.  For example, look at this picture below.  It you look at the green part or out-of-focus part you will see little circles.  This is what bokeh is.


Now you're probably wondering, How do you get bokeh?  It can actually be quite easy.  I find that leaves in the background and out-of-focus (just because it's out-of-focus doesn't mean it is bokeh) will usually give me some bokeh.  You can also try leaves.  If you look at the picture below you can see there sort of is bokeh, but it's not very clear.  So to help it we went on to Picmonkey (and this effect is FREE) and we clicked on Effects.  We scrolled down until we got to Bokeh.  We then applied it.  You can adjust the bokeh to different sizes.  One thing though, when we applied it, it covered the whole picture so this is what we did.  When you apply an effect a box will come up.  You'll want to click on Original under Mode.  Then drag the circle over the bokeh you want to get rid of.  Voila!  Below is a before and after picture of a photo we added bokeh to.

Before......

After......


What do you think of bokeh?

Marisol

P.S.  Thank you for 28 followers!  Only 2 more until 30 and then we will have a giveaway!  Oh, and don't I look just gorgeous in the photos? ;)

Wednesday, May 8, 2013

We Got Awarded!

Hi there!  We got a fabulous award from the dolls over at Our AG Adventures.  Thank you so much!
Isn't it just to cute?  Thanks Our AG Adventures!

Love,
Marisol

Follow Our Blog with Bloglovin' Soon!

Follow my blog with Bloglovin

Saturday, May 4, 2013

Springtastic Day 4: The Side Knot


 Hi there!  Sorry that we didn't get up a post for our series yesterday.  Today, however, I'm going to show you how to do the side knot.  Yup, that's right.  You probably have heard of top knots, so I was thinking, why not a side knot?  They are very easy and look great with everything.

First, comb the hair to one side.  There shouldn't really be a part.  It should all be going to one side.

Pull the hair back until it's behind the ear and then start twisting it.

Then wrap it around into a bun shape.  Use hair elastics to hold in place and then use bobby pins to pin it close to the head.

If your doll has short or layered hair some strands will probably fall out.  That is totally ok.  In fact, that was the look we were hoping for.

And there you have it!  The side knot!


What do you think of the side knot?
Love,
Marisol

P.S.  We just added a bunch more items to our Etsy shop!  Check it out! etsy.com/shop/sodapopstreet


Saturday, April 6, 2013

DIY Lace Pockets

Hey girls!  Are you ready for spring?  I certainly am.  And now, since the weather has begun to warm up a little, I wanted to spice up some of my old spring/summer clothes.  Since lace is so in right now, I thought, why not lace pockets? 
You're going to need:
-a pair of shorts, capris, or jeans
-lace
-scissors
-pins
-sewing machine or needle and thread

First, pin the lace onto one of the back pockets.

Cut the lace out around the pocket.  Trim to fit the pocket and then repeat on the other pocket.

This part can be a bit tricky, so take your time.  Sew the lace onto the pocket about an 1/8 of an inch away from the edge.  DON'T sew the top part.  Just the sides and bottom.  Make sure you sew it to only the back parts of the shorts, not the front part.  Do this for the other pocket.  Now your done!


Enjoy your "new" shorts/capris/jeans! 
Marisol

Wednesday, January 23, 2013

How to do a Top Knot

Today I (Marisol) am going to show you how to do a top knot.  Top knot's are totally in right now and they look really cute with many outfits. 
First your going to brush out the hair.


Then gather it up in a super-high pony, on top of your head.


Twist the hair upwards.


Wrap the hair around the pony holder, into the shape of a bun.  Tuck the ends in.

Use bobby pins to hold in place.

And...voila!  You're done!
Tienes divertido! (Have fun),
Marisol